Chat
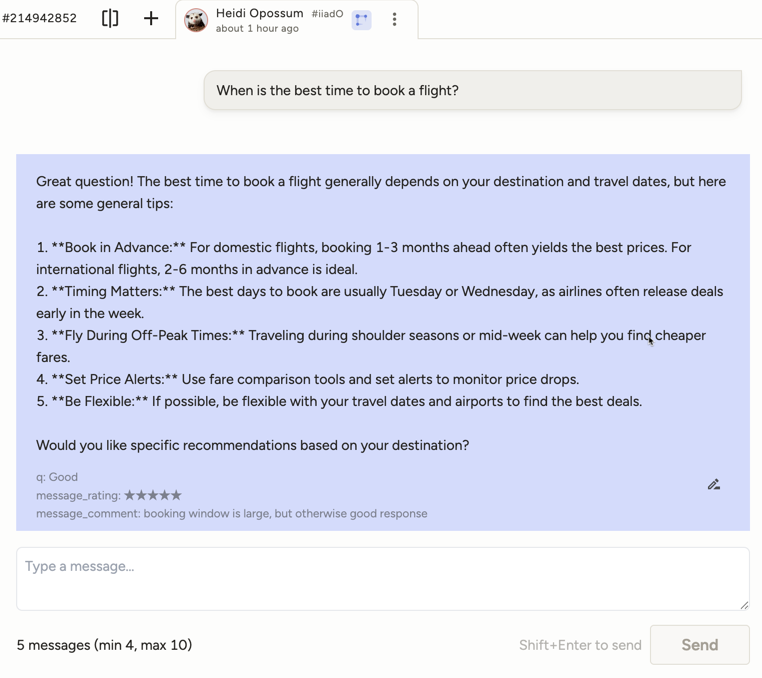
The Chat tag displays a conversational transcript and lets annotators extend it by adding new messages as they label.
The initial transcript is provided from task data via the value attribute. See the example below.
Use with the following data types: JSON array of message objects.
Enterprise
This tag is only available for Label Studio Enterprise users.
Use with an LLM
Optionally, the tag can request automatic replies from an LLM.
To use an LLM, you need to do two things:
Add a model provider API key to your organization. See Model providers.
Once you have added an API key for a model provider, set the
llmattribute on the<Chat>tag to the model you want to use.The
llmattribute must use the format<provider>/<model>. For example,llm="openai/gpt-5".
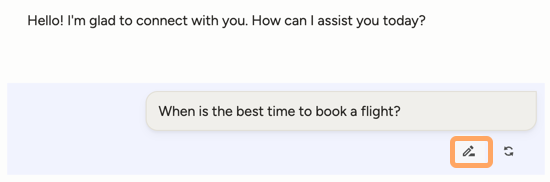
Editing messages
You can allow annotators to edit the messages that they enter and, if applicable, responses from the LLM.
Set the editable parameter to "true" or to a list of roles that should be editable. To edit a message, hover over it to view the edit icon.
Annotators cannot edit messages from the imported task data.
Parameters
| Param | Type | Description |
|---|---|---|
| name | string |
Name of the element |
| value | string |
Data field containing an array of chat messages or empty array |
| [messageroles] | string |
Comma-separated list of roles that the user can create and send messages on behalf of. Default is “user” if the llm parameter is set; default is “user,assistant” if not. |
| [editable] | boolean | string |
Whether messages are editable. Use true/false, or a comma-separated list of roles that are editable |
| [minmessages] | string | number |
Minimum total number of messages required to submit |
| [maxmessages] | string | number |
Maximum total number of messages allowed |
| [llm] | string |
Model used to enable automatic assistant replies, format: <provider>/<model> |
Examples
Example <Chat> tag
Allow composing both user and assistant messages and allow auto-replies using an LLM model
<View>
  <Chat
    name="conversation" value="$messages"
    messageroles="user,assistant" llm="openai/gpt-5"
    minMessages="4" maxMessages="20"
    editable="user,assistant"
  />
</View>
Example labeling config
Evaluate assistant responses:
<View>
  <Style>
    .htx-chat{flex-grow:1}
    .htx-chat-sidepanel{flex:300px 0 0;display:flex;flex-direction:column;border-left:2px solid #ccc;padding-left:16px}
  </Style>
  <View style="display:flex;width:100%;gap:1em">
    <Chat name="chat" value="$messages" llm="openai/gpt-4.1-nano" minMessages="4" maxMessages="10" editable="true" />
    <View className="htx-chat-sidepanel">
      <View style="position:sticky;top:14px">
        <!-- Invitation/explanation on how to evaluate -->
        <View visibleWhen="no-region-selected">
          <Text name="_3" value="Click on a message to rate specific parts of the conversation"/>
        </View>
        <!-- Evaluate assistant messages -->
        <View visibleWhen="region-selected" whenRole="assistant">
          <Text name="_1" value="Rate the response" />
          <Rating name="response_rating" toName="chat" perRegion="true" />
        </View>
      </View>
      <!-- Evaluate the whole conversation -->
      <View style="margin-top:auto;height:130px">
        <Header size="4">Overall quality of this conversation</Header>
        <Rating name="rating" toName="chat" />
      </View>
    </View>
  </View>
</View>
Example input data
This example JSON input data is called in the value="$messages" parameter on the Chat tag in the examples above.
role— speaker identifier; supported roles:user,assistant,system,tool,developercontent— message text
{
  "data": {
    "messages": [
      {
        "role": "user",
        "content": "Start with a kick-off message to validate the quality of it based on further conversation"
      }
    ]
  }
}